Ansible介绍
Ansible是一个同时管理多个远程主机的软件(任何可以通过SSH协议登录的机器),因此Ansible可以管理远程虚拟机、物理机,也可以是本地主机(linux、windows)。
Ansible通过SSH协议实现管理节点、远程节点的通信。
只要是能够SSH登录的主机完成的操作,都可以通Ansible自动化操作,比如批量复制、批量删除、批量修改、批量查看、批量安装、重启、更新等。
1.ansible是基于python语言开发的自动运维工具(由于python是解释型的特点,机器上必须要安装python运行环境)
2.ansible基于ssh协议实现安全通信。Ansible特点
Ansible的编排引擎可以出色的完成配置管理、流程控制、资源部署等多方面的操作。和其他IT自动化产品比较,Ansible无须安装客户端软件,管理简便,功能强大,便于维护。
Ansible基于Python开发,由主要的Paramiko和PyYAML两个关键模块构建。
安装部署简单,学习曲线平坦
管理主机便捷,支持多台主机并行管理
无须单独在被管理主机上安装客户端软件(no agents),无须占用其他端口,仅利用SSH服务工作。
远程执行安全,轻松对执行的内容进行审计、评估、重写
能够立即管理远程主机,无须事先安装任何客户端。
不仅支持python、还可以使用其他语言开发模块。
非root账户可用
不需要安装服务端(no servers),不需要守护进程服务
有活跃的官方社区
在云计算时代,基础架构必须满足按需自动伸缩、按使用量计费的基本特性,因此自动化运维软件是必备的工具之一。
Anisble架构
Anisble命令语法

ansible批量管理命令主要涉及6部分
ansible主命令
指定ansible管理的主机信息,可以是主机组名、主机ip地址、或是
all调用ansible的模块参数
-m指定用哪一个功能模块,模块的名字,如shell模块
调用对应模块的功能参数,-a
执行对应模块中的哪些功能,如hostname
ansible是新出现的自动化运维工具,基于Python开发,集合了众多运维工具(puppet、cfengine、chef、func、fabric)的优点,实现了批量系统配置、批量程序部署、批量运行命令等功能。
Options:
-a MODULE_ARGS, --args=MODULE_ARGS
#module arguments
#指定执行模块使用的参数
--ask-vault-pass
#ask for vault password
#加密playbook文件时提示输入密码
-B SECONDS, --background=SECONDS
#run asynchronously, failing after X seconds(default=N/A)
#后台运行超时时间,异步运行,X秒之后失败
-C, --check
#don't make any changes; instead, try to predict some of the changes that may occur
#模拟执行,不会真正在机器上执行(查看执行会产生什么变化)
-D, --diff
#when changing (small) files and templates, show the differences in those files; works great with --check
#当更新的文件数及内容较少时,该选项可显示这些文件不同的地方,该选项结合-C用会有较好的效果
-e EXTRA_VARS, --extra-vars=EXTRA_VARS
#set additional variables as key=value or YAML/JSON
#执行命令时添加额外参数变量
-f FORKS, --forks=FORKS
#specify number of parallel processes to use(default=5)
#并行任务数。FORKS被指定为一个整数,默认是5
-h, --help
#show this help message and exit
#打开帮助文档API
-i INVENTORY, --inventory-file=INVENTORY
#specify inventory host path(default=/etc/ansible/hosts) or comma separated host list.
#指定要读取的Inventory文件
-l SUBSET, --limit=SUBSET
#further limit selected hosts to an additional pattern
#限定执行的主机范围
--list-hosts
#outputs a list of matching hosts; does not execute anything else
#列出执行匹配到的主机,但并不会执行
-m MODULE_NAME, --module-name=MODULE_NAME
#module name to execute (default=command)
#指定执行使用的模块,默认使用 command 模块
-M MODULE_PATH, --module-path=MODULE_PATH
#specify path(s) to module library (default=None)
#要执行的模块的路径
--new-vault-password-file=NEW_VAULT_PASSWORD_FILE
#new vault password file for rekey
#
-o, --one-line
#condense output
#压缩输出,摘要输出.尝试一切都在一行上输出
--output=OUTPUT_FILE
#output file name for encrypt or decrypt; use - for stdout
#
-P POLL_INTERVAL, --poll=POLL_INTERVAL
#set the poll interval if using -B (default=15)
#设置轮询间隔,每隔数秒。需要- B
--syntax-check
#perform a syntax check on the playbook, but do not execute it
#检查Playbook中的语法书写
-t TREE, --tree=TREE
#log output to this directory
#将日志内容保存在该输出目录,结果保存在一个文件中在每台主机上
--vault-password-file=VAULT_PASSWORD_FILE
#vault password file
#
-v, --verbose
#verbose mode (-vvv for more, -vvvv to enable connection debugging)
#执行详细输出
--version
#show program's version number and exit
#显示版本
Connection Options:
control as whom and how to connect to hosts
-k, --ask-pass
#ask for connection password
#
--private-key=PRIVATE_KEY_FILE, --key-file=PRIVATE_KEY_FILE
#use this file to authenticate the connection
#
-u REMOTE_USER, --user=REMOTE_USER
#connect as this user (default=None)
#指定远程主机以USERNAME运行命令
-c CONNECTION, --connection=CONNECTION
#connection type to use (default=smart)
#指定连接方式,可用选项paramiko (SSH)、ssh、local,local方式常用于crontab和kickstarts
-T TIMEOUT, --timeout=TIMEOUT
#override the connection timeout in seconds(default=10)
#SSH连接超时时间设定,默认10s
--ssh-common-args=SSH_COMMON_ARGS
#specify common arguments to pass to sftp/scp/ssh (e.g.ProxyCommand)
#
--sftp-extra-args=SFTP_EXTRA_ARGS
#specify extra arguments to pass to sftp only (e.g. -f, -l)
#
--scp-extra-args=SCP_EXTRA_ARGS
#specify extra arguments to pass to scp only (e.g. -l)
#
--ssh-extra-args=SSH_EXTRA_ARGS
#specify extra arguments to pass to ssh only (e.g. -R)
#
Privilege Escalation Options:
control how and which user you become as on target hosts
-s, --sudo
#run operations with sudo (nopasswd) (deprecated, use become)
#相当于Linux系统下的sudo命令
-U SUDO_USER, --sudo-user=SUDO_USER
#desired sudo user (default=root) (deprecated, use become)
#使用sudo,相当于Linux下的sudo命令
-S, --su
#run operations with su (deprecated, use become)
#
-R SU_USER, --su-user=SU_USER
#run operations with su as this user (default=root) (deprecated, use become)
#
-b, --become
#run operations with become (does not imply password prompting)
#
--become-method=BECOME_METHOD
#privilege escalation method to use (default=sudo),valid choices: [ sudo | su | pbrun | pfexec | doas |dzdo | ksu | runas ]
#
--become-user=BECOME_USER
#run operations as this user (default=root)
#
--ask-sudo-pass
#ask for sudo password (deprecated, use become)
#
--ask-su-pass
#ask for su password (deprecated, use become)
#
-K, --ask-become-pass
#ask for privilege escalation password
#Ansible安装部署
在master-61管理机安装
[root@master-61 ~]#yum install epel-release ansible libselinux-python -y
#前提你配置好了阿里云的epel源可以直接安装
yum install ansible -y yum源配置
wget -O /etc/yum.repos.d/CentOS-Base.repo https://mirrors.aliyun.com/repo/Centos-7.repo
wget -O /etc/yum.repos.d/epel.repo https://mirrors.aliyun.com/repo/epel-7.repo
yum clean all
yum makecacheepel源
[root@master-61 /etc/yum.repos.d]#cat epel.repo
[epel]
name=Extra Packages for Enterprise Linux 7 - $basearch
baseurl=http://mirrors.aliyun.com/epel/7/$basearch
failovermethod=priority
enabled=1
gpgcheck=0
gpgkey=file:///etc/pki/rpm-gpg/RPM-GPG-KEY-EPEL-7

[epel-debuginfo]
name=Extra Packages for Enterprise Linux 7 - $basearch - Debug
baseurl=http://mirrors.aliyun.com/epel/7/$basearch/debug
failovermethod=priority
enabled=0
gpgkey=file:///etc/pki/rpm-gpg/RPM-GPG-KEY-EPEL-7
gpgcheck=0

[epel-source]
name=Extra Packages for Enterprise Linux 7 - $basearch - Source
baseurl=http://mirrors.aliyun.com/epel/7/SRPMS
failovermethod=priority
enabled=0
gpgkey=file:///etc/pki/rpm-gpg/RPM-GPG-KEY-EPEL-7
gpgcheck=0
yum源
[root@master-61 /etc/yum.repos.d]#cat centos-base.repo
# CentOS-Base.repo
#
# The mirror system uses the connecting IP address of the client and the
# update status of each mirror to pick mirrors that are updated to and
# geographically close to the client.  You should use this for CentOS updates
# unless you are manually picking other mirrors.
#
# If the mirrorlist= does not work for you, as a fall back you can try the
# remarked out baseurl= line instead.
#
#

[base]
name=CentOS-$releasever - Base - mirrors.aliyun.com
failovermethod=priority
baseurl=http://mirrors.aliyun.com/centos/$releasever/os/$basearch/
        http://mirrors.aliyuncs.com/centos/$releasever/os/$basearch/
        http://mirrors.cloud.aliyuncs.com/centos/$releasever/os/$basearch/
gpgcheck=1
gpgkey=http://mirrors.aliyun.com/centos/RPM-GPG-KEY-CentOS-7

#released updates
[updates]
name=CentOS-$releasever - Updates - mirrors.aliyun.com
failovermethod=priority
baseurl=http://mirrors.aliyun.com/centos/$releasever/updates/$basearch/
        http://mirrors.aliyuncs.com/centos/$releasever/updates/$basearch/
        http://mirrors.cloud.aliyuncs.com/centos/$releasever/updates/$basearch/
gpgcheck=1
gpgkey=http://mirrors.aliyun.com/centos/RPM-GPG-KEY-CentOS-7

#additional packages that may be useful
[extras]
name=CentOS-$releasever - Extras - mirrors.aliyun.com
failovermethod=priority
baseurl=http://mirrors.aliyun.com/centos/$releasever/extras/$basearch/
        http://mirrors.aliyuncs.com/centos/$releasever/extras/$basearch/
        http://mirrors.cloud.aliyuncs.com/centos/$releasever/extras/$basearch/
gpgcheck=1
gpgkey=http://mirrors.aliyun.com/centos/RPM-GPG-KEY-CentOS-7

#additional packages that extend functionality of existing packages
[centosplus]
name=CentOS-$releasever - Plus - mirrors.aliyun.com
failovermethod=priority
baseurl=http://mirrors.aliyun.com/centos/$releasever/centosplus/$basearch/
        http://mirrors.aliyuncs.com/centos/$releasever/centosplus/$basearch/
        http://mirrors.cloud.aliyuncs.com/centos/$releasever/centosplus/$basearch/
gpgcheck=1
enabled=0
gpgkey=http://mirrors.aliyun.com/centos/RPM-GPG-KEY-CentOS-7

#contrib - packages by Centos Users
[contrib]
name=CentOS-$releasever - Contrib - mirrors.aliyun.com
failovermethod=priority
baseurl=http://mirrors.aliyun.com/centos/$releasever/contrib/$basearch/
        http://mirrors.aliyuncs.com/centos/$releasever/contrib/$basearch/
        http://mirrors.cloud.aliyuncs.com/centos/$releasever/contrib/$basearch/
gpgcheck=1
enabled=0
gpgkey=http://mirrors.aliyun.com/centos/RPM-GPG-KEY-CentOS-7
查看Ansible版本
[root@master-61 ~]#ansible --version
ansible 2.9.27
  config file = /etc/ansible/ansible.cfg
  configured module search path = [u'/root/.ansible/plugins/modules', u'/usr/share/ansible/plugins/modules']
  ansible python module location = /usr/lib/python2.7/site-packages/ansible
  executable location = /usr/bin/ansible
  python version = 2.7.5 (default, Apr 11 2018, 07:36:10) [GCC 4.8.5 20150623 (Red Hat 4.8.5-28)]
主机清单文件(主机分组)
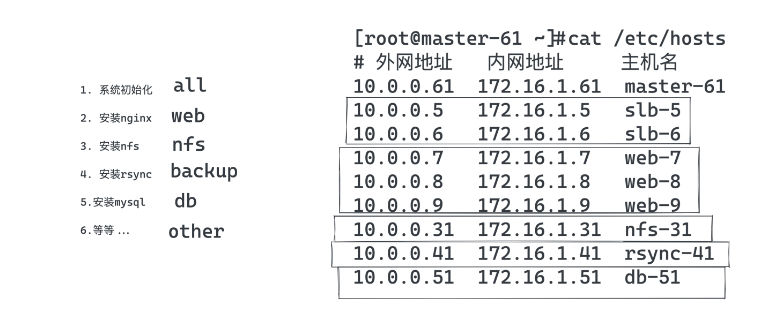
主机清单配置文件
[root@master-61 ~]#tail -10 /etc/ansible/hosts
[web]
172.16.1.7
172.16.1.8
172.16.1.9
[nfs]
172.16.1.31
[backup]
172.16.1.41主机分组后,执行命令测试,批量管理一组机器
管理所有的机器,使用特殊主机组,all
让所有的主机,远程执行hostname,返回主机名信息
[root@master-61 ~]#ansible all -m shell -a "hostname"
但是默认没配置认证方式,权限被拒绝
172.16.1.9 | UNREACHABLE! => {
"changed": false,
"msg": "Failed to connect to the host via ssh: Permission denied (publickey,password).",
"unreachable": true
}
172.16.1.31 | UNREACHABLE! => {
"changed": false,
"msg": "Failed to connect to the host via ssh: Permission denied (publickey,password).",
"unreachable": true
}
172.16.1.41 | UNREACHABLE! => {
"changed": false,
"msg": "Failed to connect to the host via ssh: Permission denied (publickey,password).",
"unreachable": true
}ansible主机登录认证
Ansible批量管理主机有两种方式:
传统的密码认证
密钥管理
这里参考于"实战2-SSH综合部署"篇,所有的机器配置好公私钥登录,即可免密码操作。基于公私钥认证
1.将master61机器的公钥,分发给想免密登录的机器
[root@master-61 /scripts]#cat install_ssh.sh#!/bin/bash
#0.安装shhpass
yum install sshpass -y
#1.管理机master-61自动创建公私钥
echo "正在创建公私钥..."
if [ -f /root/.ssh/id_rsa ]
then
echo "密钥对已经存在,请检查!"
else
ssh-keygen -f /root/.ssh/id_rsa -N '' > /tmp/create_ssh.log 2>&1
fi
echo '====================分割线=============================='
#2.管理机master-61自动分发公钥到备管理机
echo "正在分发公钥中...分发的机器列表是{7,8,9,31,41}"
for ip in {7,8,9,31,41}
do
sshpass -p '123123' ssh-copy-id 172.16.1.${ip} -o StrictHostKeyChecking=no > /tmp/create_ssh.log 2>&1
echo "正在验证免密登录结果中...."
echo "远程获取到主机名: $(ssh 172.16.1.${ip} hostname)"
done
echo '====================分割线=============================='
#3.远程修改被管理机的ssh连接端口为22999,监听地址是172.16.1.xx
for ip in {7,8,9,31,41}
do
echo "修改172.16.1.${ip}的ssh端口中..."
ssh root@172.16.1.${ip} "sed -i '/Port 22/c Port 22999' /etc/ssh/sshd_config"
done
echo '====================分割线=============================='
#4.远程修改被管理机不允许密码登录,只能是密钥登录
for ip in {7,8,9,31,41}
do
echo "禁止密码登录参数修改中...当前操作的机器是172.16.1.${ip}"
ssh root@172.16.1.${ip} "sed -i '/^PasswordAuthentication/c PasswordAuthentication no' /etc/ssh/sshd_config"
echo "允许公钥登录参数修改中...当前操作的机器是172.16.1.${ip}"
ssh root@172.16.1.${ip} "sed -i '/PubkeyAuthentication/c PubkeyAuthentication yes' /etc/ssh/sshd_config"
done
echo '====================分割线=============================='
# 5.修改监听内网地址
for ip in {7,8,9,31,41}
do
echo "修改监听地址中...当前操作的机器是172.16.1.${ip}"
ssh root@172.16.1.${ip} "sed -i '/ListenAddress 0.0.0.0/c ListenAddress 172.16.1.${ip}' /etc/ssh/sshd_config"
done
echo '====================分割线=============================='
# 6.批量验证ssh修改情况
for ip in {7,8,9,31,41}
do
echo "当前查看的机器是172.16.1.${ip}"
ssh root@172.16.1.${ip} "grep -E '^(Port|PasswordAuthentication|PubkeyAuthentication|ListenAddress)' /etc/ssh/sshd_config"
done
echo '====================脚本执行完毕=============================='2.后续在对该机器操作,就直接进行ssh的公钥认证了,可以免密码,直接远程执行
[root@master-61 ~]#ansible all -m shell -a "hostname"
172.16.1.31 | CHANGED | rc=0 >>
nfs-31
172.16.1.41 | CHANGED | rc=0 >>
rsync-41
172.16.1.8 | CHANGED | rc=0 >>
web-8
172.16.1.7 | CHANGED | rc=0 >>
web-7
172.16.1.9 | CHANGED | rc=0 >>
web-9
基于密码认证
在你的客户端机器、修改了ssh默认端口、以及密码需要修改主机清单文件才可以正确连接。
注意你得配置允许密码登录才能进行如下测试,可以再开一个web-9机器。
[root@master-61 /scripts]#cat install_ssh_passwd.sh
#!/bin/bash
# 1.批量修改sshd_config配置
for ip in {7,8,9,31,41}
do
echo "允许密码登录参数修改中...当前操作的机器是172.16.1.${ip}"
ssh root@172.16.1.${ip} "sed -i '/^PasswordAuthentication/c PasswordAuthentication yes' /etc/ssh/sshd_config"
echo "禁止公钥登录参数修改中...当前操作的机器是172.16.1.${ip}"
ssh root@172.16.1.${ip} "sed -i '/PubkeyAuthentication/c PubkeyAuthentication no' /etc/ssh/sshd_config"
done
echo '====================分割线=============================='
# 2.批量验证ssh修改情况
for ip in {7,8,9,31,41}
do
echo "当前查看的机器是172.16.1.${ip}"
ssh root@172.16.1.${ip} "grep -E '^(Port|PasswordAuthentication|PubkeyAuthentication|ListenAddress)' /etc/ssh/sshd_config"
done
echo '====================脚本执行完毕=============================='[root@master-61 /scripts]#cat restart_sshd.sh #!/bin/bash # 批量重启sshd服务(如果执行出错请删除-p22999) for ip in {7,8,9,31,41} do echo "当前重启sshd服务的机器是172.16.1.${ip}" ssh -p22999 root@172.16.1.${ip} "systemctl restart sshd" done记得清理ansible缓存,不然可能测试结果有误
rm -rf ~/.ansible/cp/*
ansible主机清单配置文件语法(重要)
注意,部分资料里的主机配置文件语法,旧版如下
Ansible 2.0 has deprecated the “ssh” from ansible_ssh_useransible_ssh_host, and ansible_ssh_port to become
这是旧版本的用法
ansible_ssh_host
ansible_ssh_port
ansible_ssh_user
ansible_ssh_password
新版参数
ansible_user
ansible_host
ansible_port
如果你写旧版本的语法,新版也也认识新版参数
添加rsync机器的ssh信息
Ansible软件使用的前提是SSH+KEY免密验证的环境,如果没有配置也可以使用Ansible,如下
[root@master-61 ~]#tail -2 /etc/ansible/hosts
[backup]
172.16.1.41 ansible_port=22999 ansible_user=root ansible_password=123123
测试执行
[root@master-61 ~]#ansible backup -m ping
172.16.1.41 | SUCCESS => {
    "ansible_facts": {
        "discovered_interpreter_python": "/usr/bin/python"
    },
    "changed": false,
    "ping": "pong"
}
添加web机器组的信息
[root@master-61 ~]#tail -10 /etc/ansible/hosts
[web]
172.16.1.7 ansible_port=22999 ansible_user=root ansible_password=123123
172.16.1.8 ansible_port=22999 ansible_user=root ansible_password=123123
172.16.1.9 ansible_port=22999 ansible_user=root ansible_password=123123
[nfs]
172.16.1.31
[backup]
172.16.1.41 ansible_ssh_port=22999 ansible_ssh_user=root ansible_ssh_pass=123123测试执行
[root@master-61 ~]#ansible web -m ping
172.16.1.7 | SUCCESS => {
    "ansible_facts": {
        "discovered_interpreter_python": "/usr/bin/python"
    },
    "changed": false,
    "ping": "pong"
}
172.16.1.8 | SUCCESS => {
    "ansible_facts": {
        "discovered_interpreter_python": "/usr/bin/python"
    },
    "changed": false,
    "ping": "pong"
}
172.16.1.7 | SUCCESS => {
    "ansible_facts": {
        "discovered_interpreter_python": "/usr/bin/python"
    },
    "changed": false,
    "ping": "pong"
}
拿web-9机器测试(单独操作某主机)
[root@master-61 ~]#tail /etc/ansible/hosts
[web]
172.16.1.7 ansible_ssh_port=22999 ansible_ssh_user=root ansible_ssh_pass=1231213
172.16.1.8 ansible_ssh_port=22999 ansible_ssh_user=root ansible_ssh_pass=123123
172.16.1.9 ansible_ssh_port=22 ansible_ssh_user=root ansible_ssh_pass=yang666
[nfs]
172.16.1.31
[backup]
172.16.1.41 ansible_ssh_port=22999 ansible_ssh_user=root ansible_ssh_pass=123123故障解决
你可能会遇见如下问题,关于新机器的指纹确认问题。
[root@master-61 ~]#ansible 172.16.1.9 -m ping
172.16.1.9 | FAILED! => {
"msg": "Using a SSH password instead of a key is not possible because Host Key checking is enabled and sshpass does not support this.  Please add this host's fingerprint to your known_hosts file to manage this host."
}
解决办法1,你可以先一键分发公钥,实现批量免密登录,再ansible免密远程执行命令
解决办法2,手动ssh连接,进行指纹确认,写入到本机的~/.ssh/known_hosts
[root@master-61 ~]#cat ~/.ssh/known_hosts解决办法3,ansible配置文件中忽略指纹确认
[root@master-61 ~]#grep 'host_key_checking' /etc/ansible/ansible.cfg
host_key_checking = False
问题以及解决,可以正确操作web-9机器
[root@master-61 ~]#ansible 172.16.1.9 -m ping
172.16.1.9 | SUCCESS => {
    "ansible_facts": {
        "discovered_interpreter_python": "/usr/bin/python"
    },
    "changed": false,
    "ping": "pong"
}
踩坑记录(ansible缓存)
由于ansible在对远程主机操作之前,默认会先通过setup模块获取机器的facts(静态属性),并且会生成缓存,便于加速远程主机的操作;
但缓存也会导致一些奇怪的现象,比如客户端的机器信息更新了,服务端依旧使用的是旧数据,那就不准确了,因此可以删除缓存。
关于缓存导致bug的文章,https://serverfault.com/questions/630253/ansible-stuck-on-gathering-facts
清理ansible的缓存目录即可
[root@master-61 ~]#rm -rf ~/.ansible/cp/*同一组连续的ip
可以修改主机清单文件如下,前提是该些主机的配置一致
[web]
172.16.1.[7:9]
公共变量
当主机清单里,很多主机组,有相同的变量属性,可以写成公共变量
这部分配置是针对web主机组,抽象的变量
[root@master-61 ~]#grep -vE '^#|^$' /etc/ansible/hosts
[web:vars]
ansible_ssh_port=22999
ansible_ssh_user=root
ansible_ssh_pass=123123
[web]
172.16.1.[7:9]
[nfs]
172.16.1.31 ansible_ssh_port=22999
[backup]
172.16.1.41 ansible_ssh_port=22999 ansible_ssh_user=root ansible_ssh_pass=123123
测试
# 获取主机名
[root@master-61 ~]#ansible web -m shell -a hostname
172.16.1.9 | CHANGED | rc=0 >>
web-9
172.16.1.8 | CHANGED | rc=0 >>
web-8
172.16.1.7 | CHANGED | rc=0 >>
web-7
所有主机都生效的变量(最终版)
指定主机组名all,即可针对所有主机生效,前提是,你要确保这个信息是所有主机通用的。
[root@master-61 ~]#grep -vE '^#|^$' /etc/ansible/hosts
[all:vars]
ansible_port=22999
#ansible_user=root
#ansible_password=123123
[web]
172.16.1.7
172.16.1.8
172.16.1.9
[nfs]
172.16.1.31
[backup]
172.16.1.41远程执行命令
[root@master-61 ~]#rm -rf ~/.ansible/cp/*
[root@master-61 ~]#ansible all -m shell -a hostname
172.16.1.31 | CHANGED | rc=0 >>
nfs-31
172.16.1.8 | CHANGED | rc=0 >>
web-8
172.16.1.41 | CHANGED | rc=0 >>
rsync-41
172.16.1.7 | CHANGED | rc=0 >>
web-7
172.16.1.9 | CHANGED | rc=0 >>
web-9
ansible命令执行方式
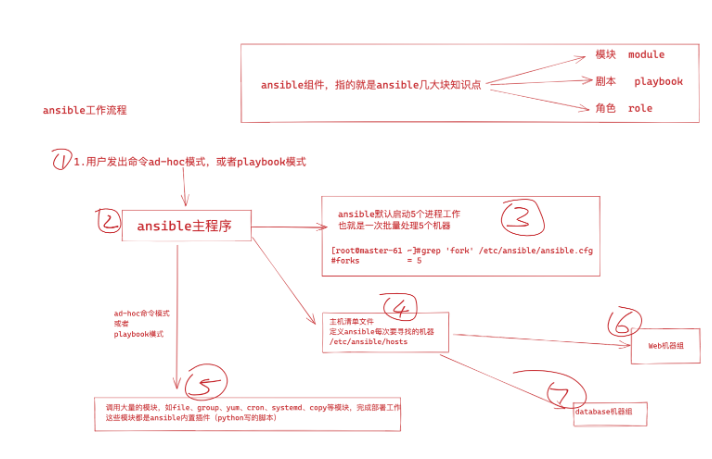
Ansible实现批量管理主机的模式主要有俩:
利用ansible命令实现批量管理(ad-hoc)模式
利用ansible剧本实现批量管理(playbook)模式
Ad-hoc和playbook的关系就好比shell命令与shell scripts的关系
ad-hoc模式
Ansible的ad-hoc模式也就是ansible的命令行模式,该模式通常用来临时处理一些任务。例如
临时批量查看所有被管控机器的内存、负载、磁盘
临时批量分发某个特定文件
Playbook模式
Ansible的playbook模式就是针对特定的具体较大的任务,事先写好执行剧本,然后在其他机器上批量执行相同的任务,属于定制化的批量执行任务,例如
一键安装Rsync
一键搭建LNMP集群等
ansible-doc命令
列出ansible所有支持的模块,这就是ansible这个万能工具箱所有的零件了。
[root@master-61 ~]#ansible-doc -l |grep ^ping
ping                                                          Try to connect to host, verify a usable python and re...
pingdom                                                       Pause/unpause Pingdom alerts


[root@master-61 ~]#ansible-doc -l |grep ^shell
shell


当前ansible支持3387个模块
[root@master-61 ~]#ansible-doc -l |wc -l
3387
当前ansible支持的模块数量
[root@master-61 ~]#ansible-doc -l |wc -l
3387
查看某个模块的具体用法
[root@master-61 ~]#ansible-doc -s shell
[root@master-61 ~]#ansible-doc -s ping